I think I have done very well over all and have made an interesting high quality animation for my first ever animation video.
Reguarding my time management, I think that I could have spent more time on the actual animation to raise the quality that of the models.
This was made difficult due to the other assignment I had due in this semmester. I have also been animating and editing right to the last week before the due date when I could have been finished earlier.
I deviated from my story boards slightly. I added in some dialogue scenes and removed the scene with the stag and horse fighting, and the hunter putting the saddle and bridle on the horse.
I think my shooting scene which was my main scene came out more or less than I imagined. And apart from a few skinning issues I was very happy with it. I animated this scene twice due to the first attempt being terrible once I really took time to watch it.
I have learnt a lot during this assignment this semmester. I have gained new important techniques that I will need to use later in life.
I have also learnt that organic models are not only very difficult to model realistically, but also extremely hard to animate convinceingly.
If I were able to do this assignment again, I would spend more time skinning and more time on the assignment as a whole. I would also add in some more complicated scenes to show off my modelling and animation.
Overall I thourghly enjoyed this assignment and feel I have learnt a lot. It doesn't feel like work at all but more like a hobby. I think the skills and techniques I have accquired will prove to be very important for my hopeful career in this area of media.
Friday, 7 May 2010
Achievements and Challenges
I think the models and materials in this assignment are some of the best I have ever made and am very pleased with them.
I also hugley proud of lip synching with the morpher took because I have never done this before.
When modelling and animating I used very few reference images, as there were few that were good enough, and no tutorials apart from one to find out how to make a particle system. I did not do this on purpose, but because I felt confident enough in each section to not use any.
A huge challenge when making this animation was that a attempted to model and animate in a realistic manner. This means that my organic modelling needed to be very convinceing and the animation movements had to be accurate to the real things.
Probably the hardest challenge I had was skinning my models. I found this process very difficult. I my well get better in time with more practice, but I struggled on this assignment.
I think the fact I attempted to make my models realistic made the skinning job tougher for myself.
Unperfected Work
In this section of my blog I will recognise any inperfected parts of my animation.
Models:
Hunter - The way I modelled the hunter was with the palms of the hands facing forwards. Only after I had added a biped and skinned the model did I realise this was wrong. Because the palms of the hands wern't downwards, the way the arm rotated would mean the palms would always face forwards and when I rotated the shoulders to stop this, there was some stretching in the should area.
However, this was barely noticable and I have definitly learned my lesson for the future.
The skilling of my hunter wasn't perfect. There was some minching on the joints. There was bad pinching in the shooting scene on the thums, fingers and wrists. This was due to me having to add a biped and skin modifier a second time and not having enough time to do a proper job.
Horse: The skinning of the horse was something I found very difficult. There was some pinching on the limbs and odd stretching on front. but the worst areas were the back legs an under belly. This is most noticable in the shooting scene, However, the way the camera moved you barely notice.
I found it difficult to realise what parts of the skin should be affected by which bones.
If I skinned this model again I think it would be btter to use a different type of bones.
Animation:
Scene 1 - In this scene the right hand of the hunter looked very odd as it was rigid and partially facing forward.
Scene 2 - The same problems as scene 1 were in this scene.
Scene 3 - In each of the different hunter copies, the arms were in a different position. So when I morphed between each model, the arm would twitch.
To stop this, the camera angle was kept tight so I couldn't see this.
Scene 4 - In this scene, because of the problems I had merging the original biped, some parts of the neck weren't weighted very well because of the short amount of time I could spend skinning.
Scene 5 - In this scene you can notice some bad pinching on the wrists.
Scene 6 - In this scene you can see the hunters fingers and thumbs have not been skinned very well. Also some hidden parts of the horse are skinned badly.
When the camera passes the hunter, I stopped animating. So when viewed from a viewport, the animation will see the hunter, bow and horse stop. Because the arrow was never unattached from the hand, the hunters right arm will carry on moving.
Scene 7 - The blood in this scene was quite fat.
Scene 8 - The same problems as in scene 4 apply to this scene.
Scene 9 - To give some idea of height, the hunter is raised off the gound with no horse in the scene.
Also, the same problems from scene three are in this scene.
Despite all these problems, I am still very pleased with the final outcome.
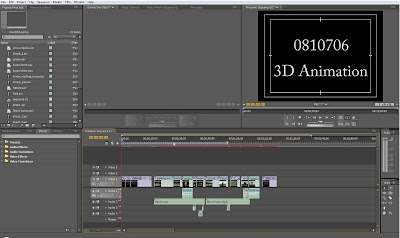
Editing
I rendered all my animations as 'Uncompressed'. Although the file size was extremely large, it provided excellent quality.
I then imported all my scenes in to Adobe Premiere Pro. I then set about editing the animation scenes if they needed to be cropped or put into slow motion. After this I set the videos out in the time line.
I added two types of fade transition effects to my animation. One was a simple fade in, and the other was a fade to black/fade in from black.
I then added some title sequences to show my SID number, the name of my fable and the moral of the fable.
After the video was put together, I started to add the audio. My two dialogue scenes already had the sound. I voiced the hunter in quite an embarrassing voice, however, it I served my purpose and am sure I won't be getting a job voice acting any time soon.
The next sound I added was a sound of birds in a forest, this sound was cropped, had fades added and turned down in Adobe Soundbooth. I then added the piece of music that begins at the shooting scene. I feel this piece of music reflected the somberness of the scene and it carried on to the blood and protest scene. This sound clip was cropped, faded and turned down in Adobe Soundbooth also.
I then added sound effects. These were a snort and a whine from a horse, a grunt from the hunter climbing on the horse which was voiced by myself, and an arrod hitting a mark.
All sounds that were not produced by myself were found on free sound websites.
I am very happy with my editing for my animation. When shooting and editing I tried to give the look and feel of the animation a simple professionalism with understated camera shots and transitions (apart from the shooting scene).
I then imported all my scenes in to Adobe Premiere Pro. I then set about editing the animation scenes if they needed to be cropped or put into slow motion. After this I set the videos out in the time line.
I added two types of fade transition effects to my animation. One was a simple fade in, and the other was a fade to black/fade in from black.
I then added some title sequences to show my SID number, the name of my fable and the moral of the fable.
After the video was put together, I started to add the audio. My two dialogue scenes already had the sound. I voiced the hunter in quite an embarrassing voice, however, it I served my purpose and am sure I won't be getting a job voice acting any time soon.
The next sound I added was a sound of birds in a forest, this sound was cropped, had fades added and turned down in Adobe Soundbooth. I then added the piece of music that begins at the shooting scene. I feel this piece of music reflected the somberness of the scene and it carried on to the blood and protest scene. This sound clip was cropped, faded and turned down in Adobe Soundbooth also.
I then added sound effects. These were a snort and a whine from a horse, a grunt from the hunter climbing on the horse which was voiced by myself, and an arrod hitting a mark.
All sounds that were not produced by myself were found on free sound websites.

I am very happy with my editing for my animation. When shooting and editing I tried to give the look and feel of the animation a simple professionalism with understated camera shots and transitions (apart from the shooting scene).
Scene 9
This scene shows the hunter talking to the horse for the second time.
Scenery: The same scenery was used as in scene 3. However, many trees were removed to look like the previous three scenes from a different angle.
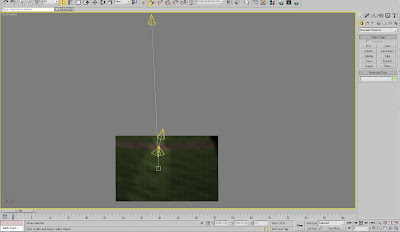
Lighting: A high target spot light acts a sun light and two target spot lights provide cross lighting for the hunter. A final spot light lights the sky plane in the background which looked too dark.
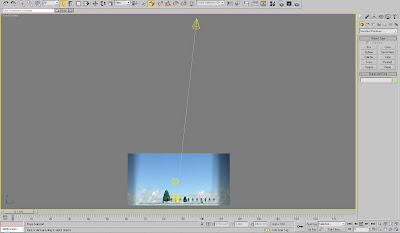
Camera: Like scene three, the camera stays stationary to avoid any flashing of the hair and fur.
Animation: The same 12 copies of the hunter that were used in scene 3 were used in this scene. The morpher modifier on the original hunter was used to mouth out the sounds of the hunters dialogue, move the chin and blink. I also
the head around to make the hunter look like he was talking.
Problems: The background plane was dark for some reason. This was fixed by shining a spot light on it.
Opinions: I think a better angle could have been found for the camera that includes the horse. however, I am again very happy with how the hunter looks like he is talkins.
Scenery: The same scenery was used as in scene 3. However, many trees were removed to look like the previous three scenes from a different angle.
Lighting: A high target spot light acts a sun light and two target spot lights provide cross lighting for the hunter. A final spot light lights the sky plane in the background which looked too dark.

Camera: Like scene three, the camera stays stationary to avoid any flashing of the hair and fur.
Animation: The same 12 copies of the hunter that were used in scene 3 were used in this scene. The morpher modifier on the original hunter was used to mouth out the sounds of the hunters dialogue, move the chin and blink. I also
the head around to make the hunter look like he was talking.

Problems: The background plane was dark for some reason. This was fixed by shining a spot light on it.
Opinions: I think a better angle could have been found for the camera that includes the horse. however, I am again very happy with how the hunter looks like he is talkins.
This scene shows the hunter protesting that the hunter has not gotten off his back.
Scenery: The scenery in this scene is the same as in scene 7.
Lighting: A high target spot light acts as sunlight whilst two target spotlights provide crosslighting for the horse and hunter. A final target spot it used to remove a bad shadow on the hunters face.
Camera: The camera starts at the left if the hunter and stag and slowelt pans and dollys to the right.
Animation: The animation is similar to that in scene 3 but more violent. The Horses head and tail moves a lot.
Problems:When setting up the scene some strange shadows appeared on the hunter. This was solved with a final target spot light.
Opinions: This is a simple scene showing the horse protesting. More time could have been spent on this. Given more time I would have liked to animate the horse rearing up.
Scenery: The scenery in this scene is the same as in scene 7.
Lighting: A high target spot light acts as sunlight whilst two target spotlights provide crosslighting for the horse and hunter. A final target spot it used to remove a bad shadow on the hunters face.

Camera: The camera starts at the left if the hunter and stag and slowelt pans and dollys to the right.

Animation: The animation is similar to that in scene 3 but more violent. The Horses head and tail moves a lot.

Problems:When setting up the scene some strange shadows appeared on the hunter. This was solved with a final target spot light.
Opinions: This is a simple scene showing the horse protesting. More time could have been spent on this. Given more time I would have liked to animate the horse rearing up.
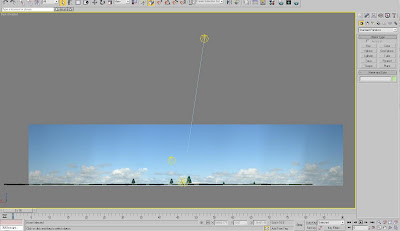
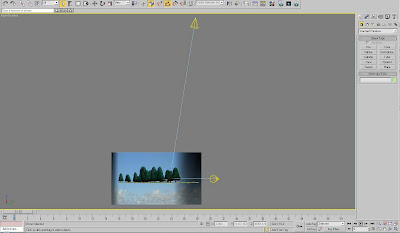
Scene 7
This scene shows a stream of blood flow from the stag after it is hit with the arrow.
Scenery: A large ground and background plane was used to accomadate the wide camera shots. A noise modifier was added to the ground before the textures were added. Trees were then added to the scene.
Lighting: A High up target spot light acts as the sun and lights the entire scene.
Camera: The camera is static allowing the blood to flow into frame.
Animation: To create the blood flow I made a super spray particle system. On this being effected by a gravity force and uDeflector force. It was then a matter of testing out different variables to get an appropriate flow.
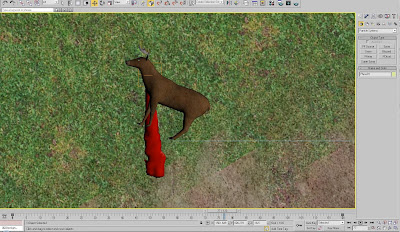
Problems: When merging the stag into the scene, all the weighting on the skin modifier was altered. I did not have enough time to fully re biped and skin the stag, so I edited the shape of the legs using editable poly.
Opinions: This was the only part of my assignment where I used part of a tutorial. I think that the flow and spreading of the blood looks realistic. However, I do feel the pool of flowing blood is too thick.
Scenery: A large ground and background plane was used to accomadate the wide camera shots. A noise modifier was added to the ground before the textures were added. Trees were then added to the scene.
Lighting: A High up target spot light acts as the sun and lights the entire scene.

Camera: The camera is static allowing the blood to flow into frame.

Animation: To create the blood flow I made a super spray particle system. On this being effected by a gravity force and uDeflector force. It was then a matter of testing out different variables to get an appropriate flow.

Problems: When merging the stag into the scene, all the weighting on the skin modifier was altered. I did not have enough time to fully re biped and skin the stag, so I edited the shape of the legs using editable poly.
Opinions: This was the only part of my assignment where I used part of a tutorial. I think that the flow and spreading of the blood looks realistic. However, I do feel the pool of flowing blood is too thick.
Scene 6
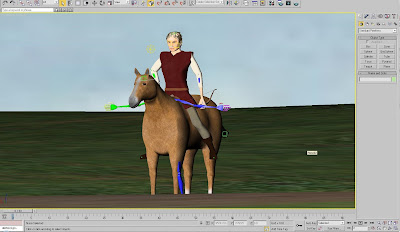
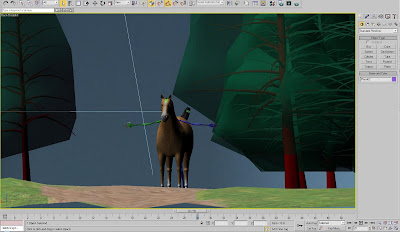
This scene is the longest and most complicated scene which shows the hunter riding the horse and firing an arrow that kills the stag.
Scenery: A large ground and background plane was used to accomadate the wide camera shots. A noise modifier was added to the ground before the textures were added. A dense area of trees was then added to show the hunter emerging from the forset and a number of smaller trees were added in the scene to give a scope of speed and scale.
Lighting: A target spot light high up lights the whole scene as spot light. Another target spot light lights the stag whose head is in shadow.
Camera: The camera moves towards the hunter as he rides forwards. It then sweeps round showing the right side of the hunter as he cocks an arrow. The camera then moves in over the hunters shoulder before tracking the arrow as it's fired and flies into the stag.
Animation: At the begining of the scene the bow and arrow are planted to the hunters hands. The run sequence of the horse has been animated using the horse animation preparation. The hunter moves with the horse rides towards the stag and
he moves the arrow in his right hand to the bow and pulls the string back. As this happens the hunters elbow is cocked upwards and a bend modifier bends the bow.
The arrow is then released flies towards the stag.
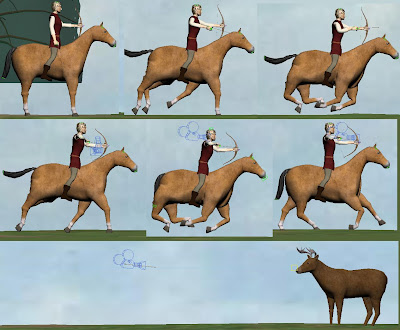
Problems: When merging the hunter into the scene, all the weighting on the skin modifier was altered. I did not have enough time to fully re biped and skin the hunter, so I imported the model and created a new human biped which was partially skinned so the hunter could be positioned and animated.
The hair and fur modifier also flashed after render. To lessen this, I used the Mental Ray render.
Opinions: I think that this scene is the best scene I animated due to it being the most dynamic and complex. After my first attept I fully re-animated the scene making
changes to the camera move, arm pulling back the arrow and the hunter on the horse.
I rendered this animation at 160 FPS to be played back at 30 fps when edited. Doing this made the animation play in slow motion.
Scenery: A large ground and background plane was used to accomadate the wide camera shots. A noise modifier was added to the ground before the textures were added. A dense area of trees was then added to show the hunter emerging from the forset and a number of smaller trees were added in the scene to give a scope of speed and scale.
Lighting: A target spot light high up lights the whole scene as spot light. Another target spot light lights the stag whose head is in shadow.

Camera: The camera moves towards the hunter as he rides forwards. It then sweeps round showing the right side of the hunter as he cocks an arrow. The camera then moves in over the hunters shoulder before tracking the arrow as it's fired and flies into the stag.

Animation: At the begining of the scene the bow and arrow are planted to the hunters hands. The run sequence of the horse has been animated using the horse animation preparation. The hunter moves with the horse rides towards the stag and
he moves the arrow in his right hand to the bow and pulls the string back. As this happens the hunters elbow is cocked upwards and a bend modifier bends the bow.
The arrow is then released flies towards the stag.

Problems: When merging the hunter into the scene, all the weighting on the skin modifier was altered. I did not have enough time to fully re biped and skin the hunter, so I imported the model and created a new human biped which was partially skinned so the hunter could be positioned and animated.
The hair and fur modifier also flashed after render. To lessen this, I used the Mental Ray render.
Opinions: I think that this scene is the best scene I animated due to it being the most dynamic and complex. After my first attept I fully re-animated the scene making
changes to the camera move, arm pulling back the arrow and the hunter on the horse.
I rendered this animation at 160 FPS to be played back at 30 fps when edited. Doing this made the animation play in slow motion.
Scene 5
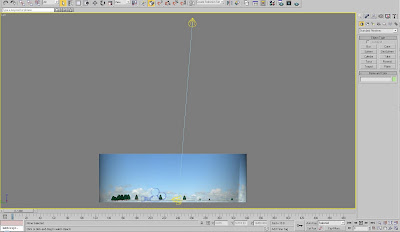
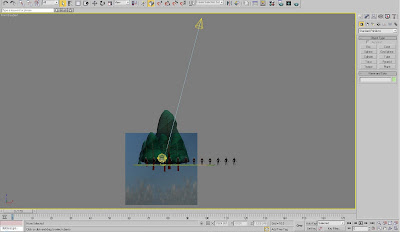
This scene shows the hunter leaping up onto the horse.
scenery: The scene used is the same as scene one.
Lighting: A high target spot light represents sun light, another lights the action in shot and a third lights the tree the camera dollys behind.
Camera: The camera slowely dollys from the left of the scene to the right to end up behind a tree.
Animation: To animate the scene planted keys were set on the hunters boots to the ground, the hunters right hand to the horse and the hunters left hand to the bow. The hunter starts by bending his knees. He then springs up into the air. The planted keys on the boots are then removed. The hunter swings his body over the horse ad his left hand rises in the air. The hunter then lands on the horses back and the planted key on the right hand is removed.
Throughout this, the horse moves it's head, leg and tail.
Problems: The skinning issues on the shoulders and right wrist can be seen in this scene.
Opinions: Although the movement isn't fully realistic, I am happy with the fluid movement of the hunter in this scene.
scenery: The scene used is the same as scene one.
Lighting: A high target spot light represents sun light, another lights the action in shot and a third lights the tree the camera dollys behind.

Camera: The camera slowely dollys from the left of the scene to the right to end up behind a tree.

Animation: To animate the scene planted keys were set on the hunters boots to the ground, the hunters right hand to the horse and the hunters left hand to the bow. The hunter starts by bending his knees. He then springs up into the air. The planted keys on the boots are then removed. The hunter swings his body over the horse ad his left hand rises in the air. The hunter then lands on the horses back and the planted key on the right hand is removed.
Throughout this, the horse moves it's head, leg and tail.

Problems: The skinning issues on the shoulders and right wrist can be seen in this scene.
Opinions: Although the movement isn't fully realistic, I am happy with the fluid movement of the hunter in this scene.
Scene 4
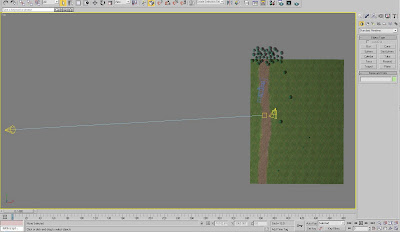
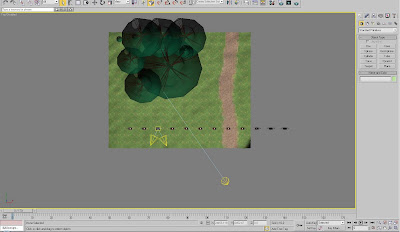
This scene shows the horse nodding to the hunter, allowing the hunter to mount.
scenery: The scene used is the same as scene one.
Lighting: A high target spot light represents sun light and another target spot light lights the horse.
Camera: The camera frames the horse and is static.
Animation: The horse head is nodding and the tails is moving.
Problems: When merging the horse into the scene, all the weighting on the skin modifier was altered. I did not have enough time to fully re-biped and skin the horse, so I imported the model and created a new human biped which was partially skinned so the horse could be partly animated.
Opinions: I think that this scene is effective in showing the horse agreeing with the hunter without the need for dialogue.
scenery: The scene used is the same as scene one.
Lighting: A high target spot light represents sun light and another target spot light lights the horse.

Camera: The camera frames the horse and is static.
Animation: The horse head is nodding and the tails is moving.

Problems: When merging the horse into the scene, all the weighting on the skin modifier was altered. I did not have enough time to fully re-biped and skin the horse, so I imported the model and created a new human biped which was partially skinned so the horse could be partly animated.
Opinions: I think that this scene is effective in showing the horse agreeing with the hunter without the need for dialogue.
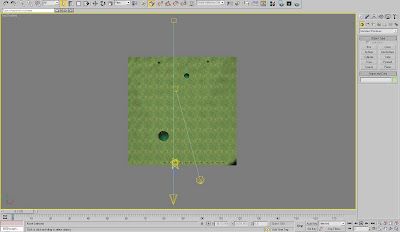
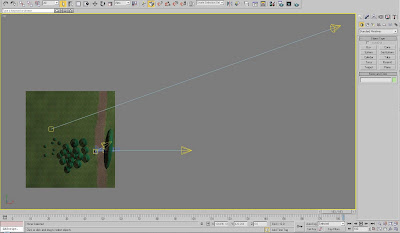
Scene 3
This scene shows the hunter talking to the horse.
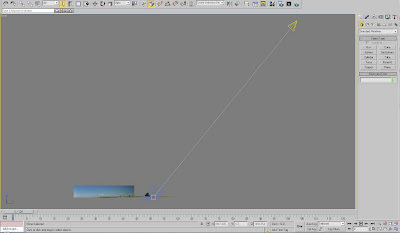
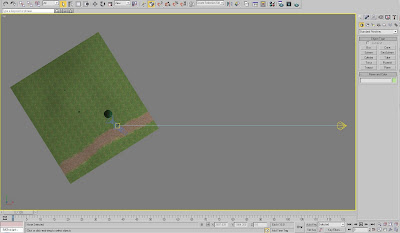
Scenery: A ground plane was made with a noise modifier and a sky plane was made for the background. The scenery materials were then added. Trees were then added to finish the scenery off.
Lighting: A high target spot light represends sunlight and two target spot lights give cross lighting to the hunters face.
Camera: The camera in this scene is a basic static shot that focuses on the hunters face.
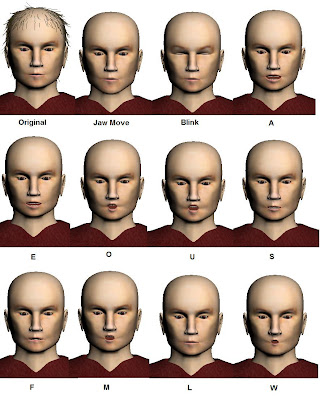
Animation: 12 copies of the hunter were made and the vertices on the copied faces were changed to form different expressions. A morpher modifier was then added to the original hunter. I then used the morpher to mouth out the sounds of the hunters dialogue, move the chin and blink. I also the head around to make the hunter look like he was talking.
Problems: Whwn originally animated, the camera slowely moved inwards. When this happened, the hair and fur modifier flashed a lot. To fix this i kept the camera static.
Oinions: I think I did very well in makeing the hunter look like he is talking.
Scenery: A ground plane was made with a noise modifier and a sky plane was made for the background. The scenery materials were then added. Trees were then added to finish the scenery off.

Lighting: A high target spot light represends sunlight and two target spot lights give cross lighting to the hunters face.

Camera: The camera in this scene is a basic static shot that focuses on the hunters face.
Animation: 12 copies of the hunter were made and the vertices on the copied faces were changed to form different expressions. A morpher modifier was then added to the original hunter. I then used the morpher to mouth out the sounds of the hunters dialogue, move the chin and blink. I also the head around to make the hunter look like he was talking.

Problems: Whwn originally animated, the camera slowely moved inwards. When this happened, the hair and fur modifier flashed a lot. To fix this i kept the camera static.
Oinions: I think I did very well in makeing the hunter look like he is talking.
Scene 2
This scene shows the hunter walking from behind the camera towards the horse and stopping.
Scenery: The scene used is the same as scene one.
Lighting: There is a high target spot light that represents the sun and a target spot light lighting the horse and hunter.

Camera: The camera is still as the hunter comes into view. The camera then pans to the left, keeping the hunter in shot, to reveal the horse.
Animation: The same techniques to animate the hunter in scene one were also used in scene two. The horse moves its tail, head and leg.
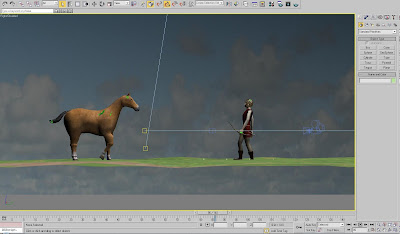
Problems: When merging the horse into the scene, all the weighting on the skin modifier was altered. I did not have enough time to fully re biped and skin the horse, so I imported the model and created a new human biped which was partially skinned so the horse could be partly animated.
Opinions: Despite the problems with the horse I feel that it's movements were realistic and the scene looks natural.
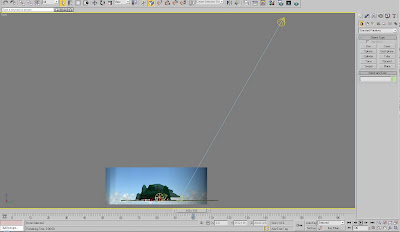
Scene 1
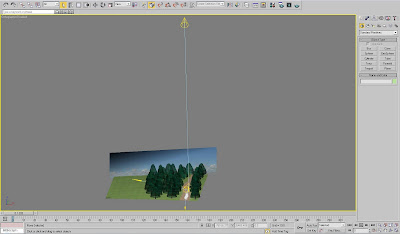
This scene shows the hunter walking through the forest with his bow looking for the horse.
Scenery: To make my scenery I created plane with my gound material for the ground and a plane
with the sky material as the sky. I then added a noise modifier and bump map to the ground.
I thenk added in trees from the 3DS Max library. I decided to use these trees because they
were very high detail and this will tie in with realistic theme for the whole animation.
Lighting: There is a target spot light high
up in the scene to act as sun light. This was the light that would create the shadows for the models and
sceney in my scene.
I then use two target spot lights to create cross lighting on the hunter.
I finally use an omni light which tracked backwards with the camera shining light on
the hunters face. This was done to emohasise the hunter for the viewer to focus on and remove any dark shadows
on the hunters face.
Camera: The camera slowley dollys backwards during the course of the scene tracking the hunters movement. The camera
slows near the end of the shot to allow the hunter to walk past.
Animation: The animation in this scene was done using the footsteps tool to create 19 steps. The arm movements were then
pulled outwards so they look more realistic. Finally, the bow was places in the left hand of the hunter and
manually key framed to move up, down and along with the walk.
As the hunter walks he looks around slightly.
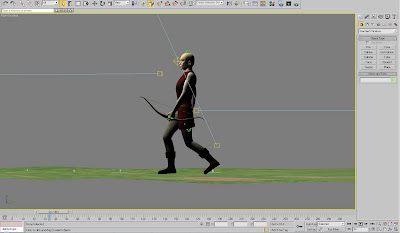
Problems: The right hand does not look natural enough due to it being rigid.
Opinions: I think this scene looks good and the hunter walks quite naturally.
Scenery: To make my scenery I created plane with my gound material for the ground and a plane
with the sky material as the sky. I then added a noise modifier and bump map to the ground.
I thenk added in trees from the 3DS Max library. I decided to use these trees because they
were very high detail and this will tie in with realistic theme for the whole animation.
Lighting: There is a target spot light high
up in the scene to act as sun light. This was the light that would create the shadows for the models and
sceney in my scene.
I then use two target spot lights to create cross lighting on the hunter.
I finally use an omni light which tracked backwards with the camera shining light on
the hunters face. This was done to emohasise the hunter for the viewer to focus on and remove any dark shadows
on the hunters face.

Camera: The camera slowley dollys backwards during the course of the scene tracking the hunters movement. The camera
slows near the end of the shot to allow the hunter to walk past.
Animation: The animation in this scene was done using the footsteps tool to create 19 steps. The arm movements were then
pulled outwards so they look more realistic. Finally, the bow was places in the left hand of the hunter and
manually key framed to move up, down and along with the walk.
As the hunter walks he looks around slightly.

Problems: The right hand does not look natural enough due to it being rigid.
Opinions: I think this scene looks good and the hunter walks quite naturally.
Thursday, 6 May 2010
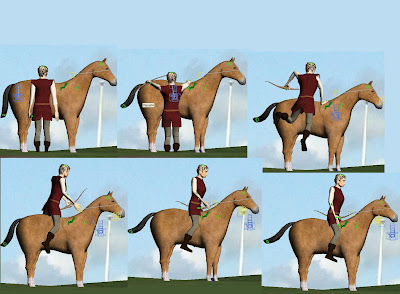
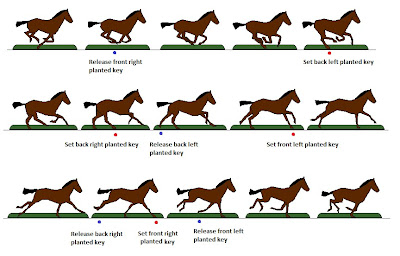
Animation Preparation
Before I start to animate there is was only one piece of preparation work that was needed to do. This was to plan the running animation of the horse.
To do this I found a series of pictures that shows the body movements of a horse and indicated when i will set and remove andy planted keys. I did this to aid the ease in which I can animate later on.
To do this I found a series of pictures that shows the body movements of a horse and indicated when i will set and remove andy planted keys. I did this to aid the ease in which I can animate later on.

Wednesday, 5 May 2010
Scene Materials
Every scene I have uses one material for the ground and one material for the sky.
To create the ground material I shound a seamless high detail image of grass on the internet and made a eight by eight equare in photoshop. I then found a high detail mud image and used it to create a path over the grass. I then used the spot healing brush tool to blend the dirt texture to the grass texture.
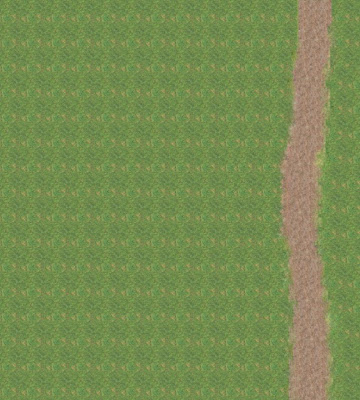
To create the sky texture I found a high detail image of the sky on the internet and used the spot healing brush tool in photoshop to edit out some parts of the picture.

Both these materials in the scene make a very realistic terrain and sky effect.
Bow & Arrow
A bow and arrow are the only two props in my animation and they have been very easy to create.
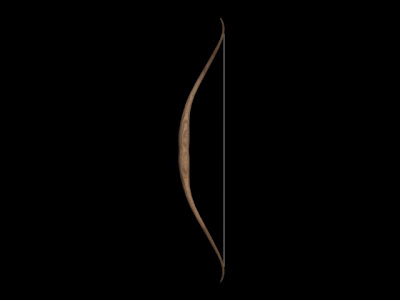
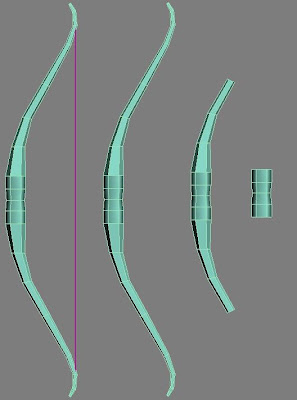
The bow started off as a cylinder which was then converted to an editable poly. A symmetry modifier was added and I extruded the poly up and out scaling the cylinder down was I reach the tip. Another long thin cylinder was then made as the string.
A UVW Map was then added with a high detail wood texture to finish the bow. A simple white material was added to finish the string.

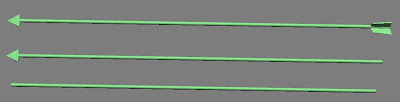
To create the arrow I created a long thin cylinder and added a UVW Map with a high quality wood texture. I then created a box, convertied it into an editable poly and tweaked the vertices to look like a quiver. A feather material was then added and the box was copied three times. One final box was then created and converted to an editable poly and the vertices tweaked to form the arrow head. A metal material was then added. Finally, I attached the four boxes to the cylinder and the arrow was complete.
Finally I attached the

The bow started off as a cylinder which was then converted to an editable poly. A symmetry modifier was added and I extruded the poly up and out scaling the cylinder down was I reach the tip. Another long thin cylinder was then made as the string.
A UVW Map was then added with a high detail wood texture to finish the bow. A simple white material was added to finish the string.

To create the arrow I created a long thin cylinder and added a UVW Map with a high quality wood texture. I then created a box, convertied it into an editable poly and tweaked the vertices to look like a quiver. A feather material was then added and the box was copied three times. One final box was then created and converted to an editable poly and the vertices tweaked to form the arrow head. A metal material was then added. Finally, I attached the four boxes to the cylinder and the arrow was complete.
Finally I attached the

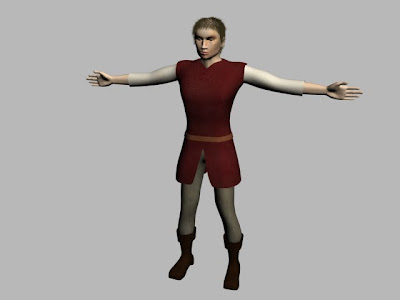
Hunter
Here how i created one of my favourite 3D models. The hunter.
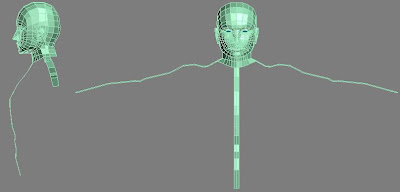
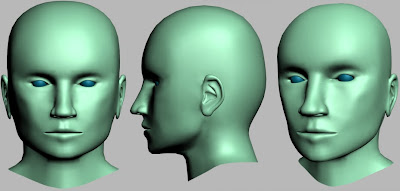
Step 1: I started by creating a plane in the front viewport, adding a symmetry modifier and converting it to an editable poly. I then extruded the edges out and tweaked the vertices in multiple viewports to create the lips and mouth. A poly was then copied up and extruded to form the eye hole. The edges were then extruded down to form the nose, nostrils and joined to the mouth.
Edges were then extruded downwards to form the chin which was then extruded up and around to form the cheeks and forehead. The cheeks were finally completed using the weld and create poly tool.
The forehead, cheeks and chin were extruded backwards and around to form the head and downwards to form the top of the neck. The vertices were then tweaked in multiple viewports to form the final shape of the head.

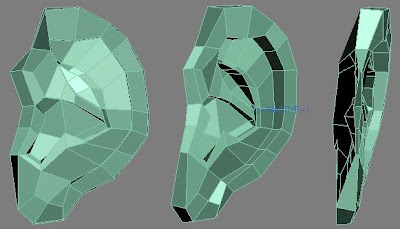
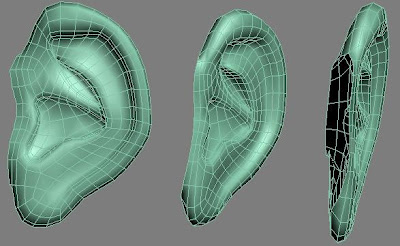
Step 2: To create the ears, a plane was copied from the head and extruded with a lot of tweaking the vertices to form the outline of the ear. The edges where then extruded inwards to form the inner ear.

Step 3: The weld and create poly tool was then used to finish off the ear. This was then welded to the head and eyeballs were created out of spheres.
Step 4: I then extruded some planed from the neck out to form guidelines for the arms and chest.
Step 5: Copying another plane from the head I then started to extrude and tweak the vertices of what would become the boot. I Extruded the edges upwards to form the calf.
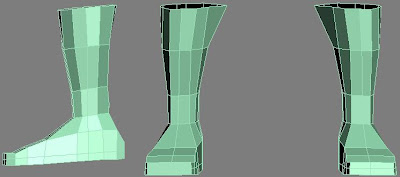
Step 6: I continued to extrude upwards forming the knees of the hunter.
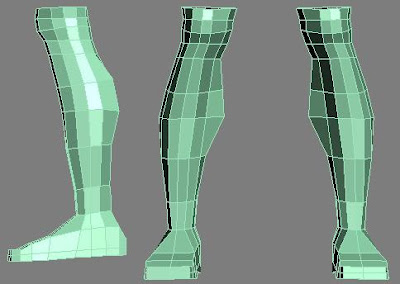
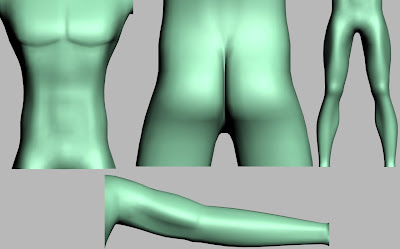
Step 7: The edges where then extruded up to create the thighs. A lot of care was taken in tweaking the vertices to get a realistic flow and the edge flows at the back of the model were tweaked to the side to form thigh muscle definition.
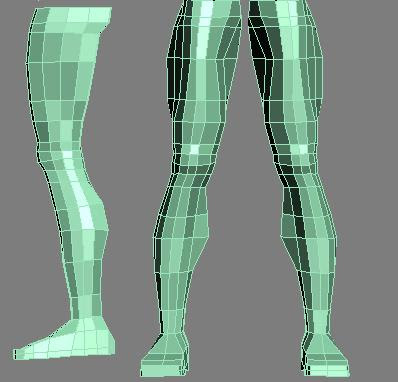
Step 8: I continued to extrude the edges upwards to form the backside and stomach of the hunter. Again, care was taken to achieve the most realistic shape possible.
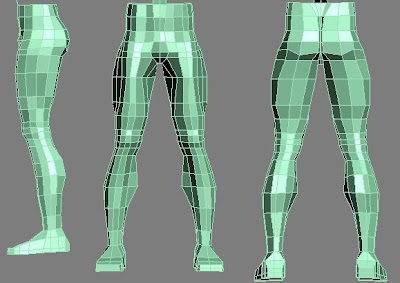
Step 9: The edges were then extruded upwards and joined to the neck to form the torso of the hunter. the chest and neck edges were then extruded out to form the start of the arms. A long time was spent on the muscle definition on the arms, chest and stomach here.
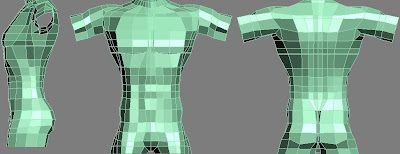
Step 10: The arm edges were then extruded outwards to form the elbows and wrists.
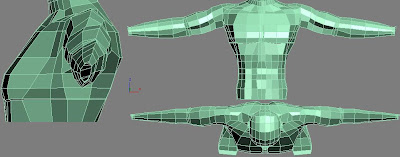
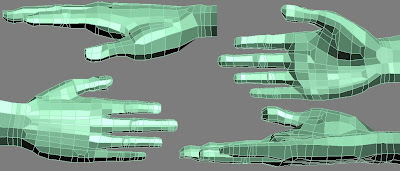
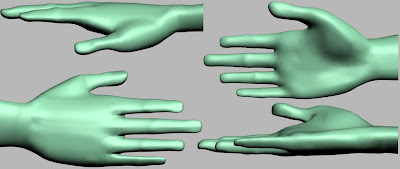
Step 11: The hands were created by extruding the wrist edges out. I created more edge loops to allow myseld to model in more detail whilst keeping food modelling practice.
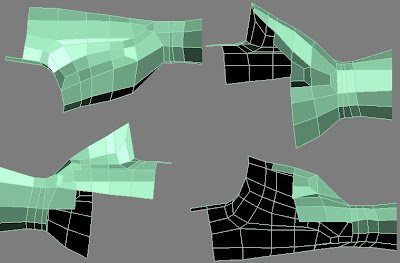
Step 12: I continued to extrude the edges to form the palm, back of the hand and start of the finger joints.
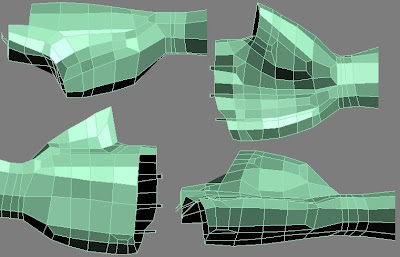
Step 13: I again added more edge loops on the lip and bottom of the hand to allow myself to model in more detail. The finger joints were then extruded outwards to form the start of the fingers and first knuckles.
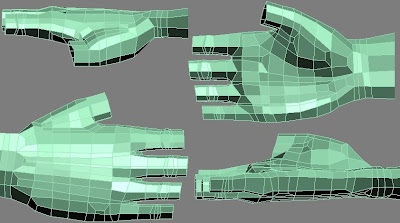
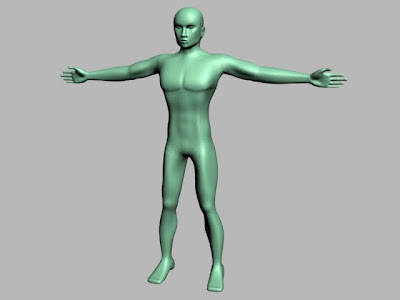
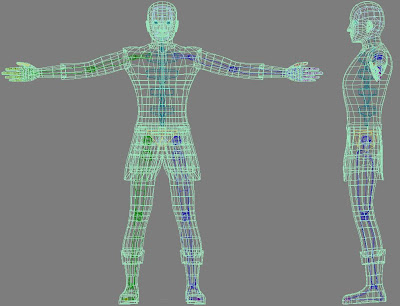
Step 14: Finally the fingers were extruded out to form the final knuckle, finger tips and finger nails. A mesh smooth was added to complete the modeling of my naked hunter model
I spent a lot of time adding in detail to this model which ultimately would not be seen by anyone. I did not only for pleasure but experience. This is the first body/human model I have created and feel it is detailed enough to be used in my portfolio.
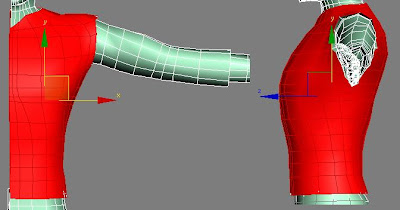
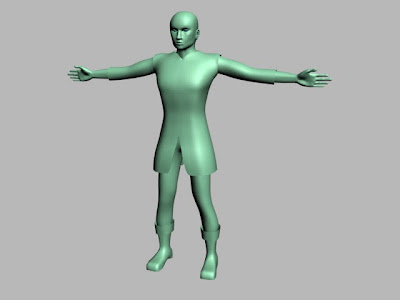
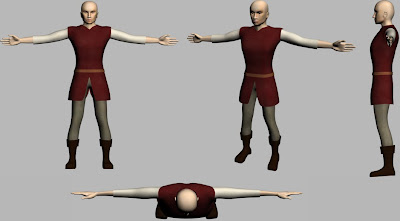
Step 15: To create the hunters clothes I selected the polys of differnt parts of clothes and extruded them outwards. I then selected all the polys and set the smooth selection to 3. The polys of the different parts of clothes where then selected and set the smooth selection to two. I selected the inner edges of the clothes and set the smooth selection to one in order to make a sharp edge defining the edge of the clothes. Finally I selected the polys of the different areas of clothes and relaxed them to lose the muscle definition I had modelled earlier. The vertices are then tweaked in different viewports to create the final shape of the hunters clothes.
Finally, the bottom of the hunters top was extruded downwards to form a tunic.
Step 16: I added a UVW Unwrap modifier to the stag and started to attach the pieces together.
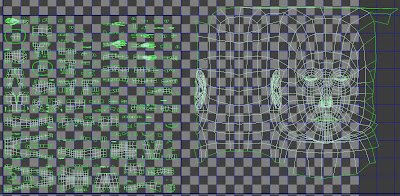
Step 17: A chequer material was used to see the unwrap progress.
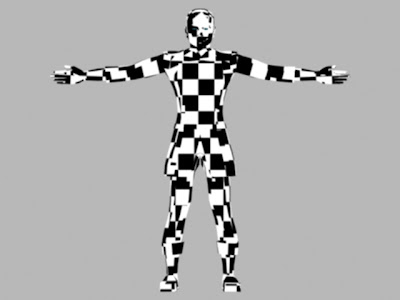
Step 18: I completed the UVW Unwrap in different sections for ease of creating a material.
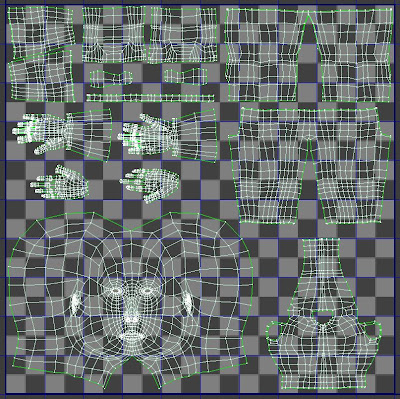
Step 19: I then checked the chequer material before proceeding to creating a material for the hunter.

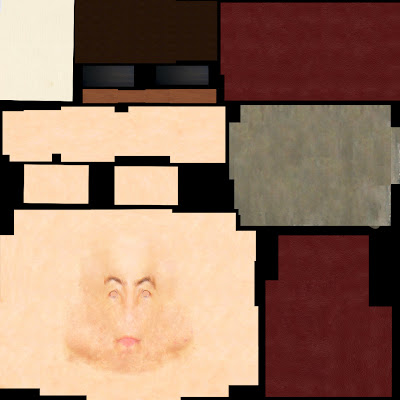
Step 20: I then created a material in photoshop using the UVW Unwrap render as a template and high quality textures found on the internet.
Step 21: I then created a biped and scaled the limps to fit the hunter. A skin modifier was then added and the vertices weighted.
Step 22: I finally added a hair and fur modifier and styled it to form the hunters hair.

I am really pleased with this model and spent far much more time than was needed. I created the body of the hunter from start to finnish without any tutorials at all. For my first attept at a human body I think I have done well.

Step 1: I started by creating a plane in the front viewport, adding a symmetry modifier and converting it to an editable poly. I then extruded the edges out and tweaked the vertices in multiple viewports to create the lips and mouth. A poly was then copied up and extruded to form the eye hole. The edges were then extruded down to form the nose, nostrils and joined to the mouth.
Edges were then extruded downwards to form the chin which was then extruded up and around to form the cheeks and forehead. The cheeks were finally completed using the weld and create poly tool.
The forehead, cheeks and chin were extruded backwards and around to form the head and downwards to form the top of the neck. The vertices were then tweaked in multiple viewports to form the final shape of the head.

Step 2: To create the ears, a plane was copied from the head and extruded with a lot of tweaking the vertices to form the outline of the ear. The edges where then extruded inwards to form the inner ear.

Step 3: The weld and create poly tool was then used to finish off the ear. This was then welded to the head and eyeballs were created out of spheres.

Step 4: I then extruded some planed from the neck out to form guidelines for the arms and chest.

Step 5: Copying another plane from the head I then started to extrude and tweak the vertices of what would become the boot. I Extruded the edges upwards to form the calf.

Step 6: I continued to extrude upwards forming the knees of the hunter.

Step 7: The edges where then extruded up to create the thighs. A lot of care was taken in tweaking the vertices to get a realistic flow and the edge flows at the back of the model were tweaked to the side to form thigh muscle definition.

Step 8: I continued to extrude the edges upwards to form the backside and stomach of the hunter. Again, care was taken to achieve the most realistic shape possible.

Step 9: The edges were then extruded upwards and joined to the neck to form the torso of the hunter. the chest and neck edges were then extruded out to form the start of the arms. A long time was spent on the muscle definition on the arms, chest and stomach here.

Step 10: The arm edges were then extruded outwards to form the elbows and wrists.

Step 11: The hands were created by extruding the wrist edges out. I created more edge loops to allow myseld to model in more detail whilst keeping food modelling practice.

Step 12: I continued to extrude the edges to form the palm, back of the hand and start of the finger joints.

Step 13: I again added more edge loops on the lip and bottom of the hand to allow myself to model in more detail. The finger joints were then extruded outwards to form the start of the fingers and first knuckles.

Step 14: Finally the fingers were extruded out to form the final knuckle, finger tips and finger nails. A mesh smooth was added to complete the modeling of my naked hunter model

I spent a lot of time adding in detail to this model which ultimately would not be seen by anyone. I did not only for pleasure but experience. This is the first body/human model I have created and feel it is detailed enough to be used in my portfolio.


Step 15: To create the hunters clothes I selected the polys of differnt parts of clothes and extruded them outwards. I then selected all the polys and set the smooth selection to 3. The polys of the different parts of clothes where then selected and set the smooth selection to two. I selected the inner edges of the clothes and set the smooth selection to one in order to make a sharp edge defining the edge of the clothes. Finally I selected the polys of the different areas of clothes and relaxed them to lose the muscle definition I had modelled earlier. The vertices are then tweaked in different viewports to create the final shape of the hunters clothes.
Finally, the bottom of the hunters top was extruded downwards to form a tunic.


Step 16: I added a UVW Unwrap modifier to the stag and started to attach the pieces together.

Step 17: A chequer material was used to see the unwrap progress.

Step 18: I completed the UVW Unwrap in different sections for ease of creating a material.

Step 19: I then checked the chequer material before proceeding to creating a material for the hunter.

Step 20: I then created a material in photoshop using the UVW Unwrap render as a template and high quality textures found on the internet.


Step 21: I then created a biped and scaled the limps to fit the hunter. A skin modifier was then added and the vertices weighted.

Step 22: I finally added a hair and fur modifier and styled it to form the hunters hair.

I am really pleased with this model and spent far much more time than was needed. I created the body of the hunter from start to finnish without any tutorials at all. For my first attept at a human body I think I have done well.
Subscribe to:
Posts (Atom)